Showing posts with label spotty fabric. Show all posts

Monday, 16 June 2014

Baby Boy Bloomers and Bow-ties

I'm FREEEEEEE!!!!!  

On my last trip to the doctor's, I was told that I no longer need to be on bed-rest. So I've been making the very most of my new-found freedom!  We've been catching up with friends, going for 'date nights', doing lots of 'nesting'-type jobs around the house.....  And, of course, I've been getting my craft on!

At last!  The opportunity to do more baby-crafting!  And I've gone a bit silly.  I just can't stop!!!  So now, the problem is.....  I don't know which project to show you first?!?

I think I'll start with the cutest AND funniest.....

I decided to make a little outfit - some boyish 'bloomers', and a bow-tie to match.  Here's the finished outfit:


Then I had an idea - if I attached the bow-tie to the little body-suit with snap-fasteners, I could make a whole RANGE of interchangeable bow-ties (and you know how it is - newborns can never have too many bow-ties)!!! 

So I did this:


And then I IMMEDIATELY made another little outfit:


And, after that, I made MORE bow-ties!  But I'll save those for another post.....  

In 'OTHER EXCITING NEWS' (well, actually THE most exciting news).....  we visited the hospital on Friday, and I'm booked in to have a c-section on Monday 30th June.  So, only two weeks to go now!!!!!

Until next time.....

Carly

x


Thursday, 21 November 2013

Bags of Bags

So, tomorrow's Christmas Fair day at school.  I think I'm all set to go.  Everything's packed up by the front door, and I'll be setting up my stall during lunch break.  Does anyone else feel stupidly nervous before craft fairs???

Here's another quick show-and-tell of what I've been making, in preparation for the fair.  Today's 'topic' is bags.....


A grey, yellow and white stripy one:


A white, red, turquoise and grey spotty one:


A green, yellow, brown and white spotty one:


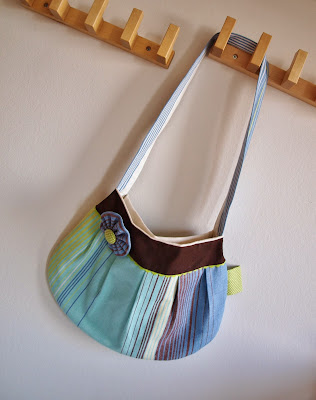
A turquoise, blue, lime and brown stripy one:


And an orangey-red, lime and yellow one: 


My favourite's the turquoise, blue, lime and brown stripy one.  I want to keep it.  Is that bad?  I may have to sneak it off my stall and keep it for myself.  We'll see how the willpower goes tomorrow.....

These bags were all made from the 'Buttercup Bag' pattern, from Made by Rae.  You can download the (brilliant) pattern for free here, and you can buy a license to sell them if you wish to do so.  

I'll let you know how the fair goes..... 

Bye for now!

Carly

x

Thursday, 12 September 2013

Passport and Travel Document Wallet

Just before the summer holidays are well and truly packed away as distant memories, I wanted to show you the passport and travel document wallet I made to take to Italy.  

I get a bit stressed about packing to go away.  I'm hopeless at it!!!  I pride myself on being organised in every other aspect of life but, for some reason, just can't get it together when it comes to packing.  I always take WAY too much - half of which I KNOW I won't wear once!     

AND, in the midst of all of my fussing, I ALWAYS decide to start on a sewing project a few days before we leave.  WHY???  I don't know.  Once I just HAD to have a new beach bag to take with me.  Another time, I needed some of my little rosette pins (link to tutorial here) to match with each outfit I was taking with me.  Then there was the time I was desperate for a new toiletry bag.....  It's become a holiday tradition, in fact!   

This time, I made up my mind that the whole holiday would be a total disaster if I didn't make us a new travel document wallet.  I found the tutorial I wanted to use here.  It was pretty easy to follow, but there were lots of pieces to cut out and sew together.  So it took a while.  I was really happy with it when I was done, though.  


And, in the end, of course, I managed to finish all my packing AND my last-minute sewing project!!!  

It did a great job of looking after our passports and very important documents for us.  Who knows what would have happened to them if I hadn't SQUEEZED in this ONE last little make before we left?!?

Carly

x


Tuesday, 2 July 2013

Rosette Pin Tutorial

I'm making these little pretties all the time!  They’re quick and easy – and brighten up any outfit!  They're also a great way of using up fabric scraps that are too cute to throw away.  So, I thought I'd share a quick how-to with you.....

   
What you’ll need:

- A 7x24cm strip of fabric
- A big-ish button in a contrasting colour (I used a button-covering kit to make this one)
- A brooch pin
- Some thread
- A needle
- Scissors
- A sewing machine (if you’re lazy like me)

    
What to do:

1. Take your strip of fabric and fold it in half, so that the right sides are facing each other (as in the picture).


2. Sew a 1cm seam along the short (raw) edge, to make a tube.  Remember to backstitch at both ends.


3. Press the seam open.

4. Now fold the fabric tube in half, so that the wrong sides are facing each other (see the picture).


5. Press the fold.

6. Take a length of thread (about 80cm) and fold it in half.  Thread your needle.


7. Starting just to one side of the seam, stitch all around the raw edge.  The stitches should be about 1cm in length, and spaced about 1cm apart. 


8. Pull the two ends of the thread, to tightly close the hole in the centre of the fabric and create the rosette.  Tie a few knots in the thread, but don’t cut it yet.

9. Now use one of the ends of doubled-up thread to sew on your button.  This is a bit fiddly (as you can see in the pictures).


10. When the button’s secure, neaten the underside of the rosette by sewing the pleats together.


11. Now sew on your brooch pin...... 


12. ..... and you’re done!  

Now make heaps more, so that you’re got one to suit every mood and liven up every outfit!


If you give this tutorial a try, I’d love to see the results.....

Carly


x

Tuesday, 11 June 2013

2nd Blogging Birthday Giveaway

Today’s my second ‘bloggiversary’ – hooray!  I really can’t believe that I’ve been doing this for two whole years!

I LOVE blogging.
 
I sometimes feel as though I put too much pressure on myself to get posts up, and I sometimes get annoyed with myself for spending too much time sitting in front of my computer. I get a bit nervous before I post things about myself, or before I do a show-and-tell of something I’ve made. I worry that people won’t visit me here, or that they might not like what I’m doing. I feel guilty if I haven’t visited certain blogs for a while, and I feel bad if I don’t get around to replying to the comments people leave me here..... 

But, I REALLY DO LOVE BLOGGING!!!

I love playing at being an author and a photographer, and I love keeping a record of all of the crafty (and some not so crafty) things that I do. I love receiving comments and emails from 'visitors', and having the chance to ask for feedback on what I’m doing. I love visiting other people’s blogs, getting inspired, and chit-chatting with like-minded souls from all around the globe. And, most of all, I
LOVE all of the wonderful bloggy FRIENDS that I’ve made over the past two years!!!

I really can’t believe how great blogging pals are – and I’m so grateful to all of you for visiting me here, writing to me, encouraging me, and just being such blinking brilliant friends!!! Thank you, thank you, thank you!!! 
 
And, to say
THANK YOU once more, I’m going to host a little giveaway. If you enter, you could find yourself winning these summery Crafted by Carly goodies:

There’s a stripy (CK fabric) sunglasses case.....


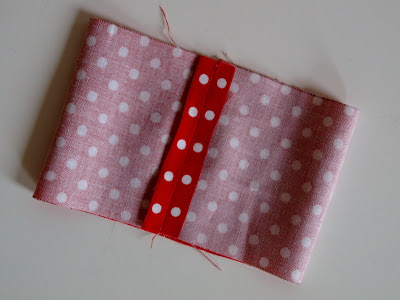
..... with a spotty-dotty lining.....


..... and two little rosette pins (one blue and one red).....


All matchy-matchy, of course!


To enter, all you need to do is:
1)  Follow my blog
2)  Leave a comment under this post, letting me know what’s YOUR favourite thing about blogging 
Easy-peasy-lemon-squeezy!

I’ll leave the giveaway open for two weeks, and randomly pick a winner on Tuesday 25th June.  Of course, it’s open to everybody, no matter whereabouts in the world you are. 

Good luck!

Hugs to you all!

Carly

x

Related Posts Plugin for WordPress, Blogger...