Sunday, 27 November 2011

Perfect Pressies

On Tuesday, it was my birthday.  I had a lovely day (and EVEN gave myself the evening off from preparing for my Open House party, to go for a surprise Italian meal with the gorgeous S)!  I received lots of lovely cards and pressies from my wonderful family and friends and, as you might guess, there was a definite crafty theme!  They OBVIOUSLY know me VERY well!!!  

So, I thought I’d share with you some of my new goodies…..


Very exciting!!!

And TWO crochet books – now I have no excuse to put of learning!!!  ;-)


I’ll be back soon, with some photos of the stuff I’ve made for the Open House…..

Carly
x

Saturday, 19 November 2011

Christmas Tree Decoration Tutorial

I’ve been ridiculously busy over the past few weeks, preparing for a Christmas ‘Open House’ party I’m going to be hosting on December 1st.  I’ve been making lots of all my ‘usual’ thingies – bags and pouches and corsages.  But, as it’s going to be a Christmassy do (with mulled wine and Christmassy nibbles, and carols, and my tree up VERY early indeed), I thought I should have a go at making some festive things to sell too.  Coming up with ideas for cute decorations has been lots of fun!  So far, I’ve made some little Christmassy houses and Christmas trees.  Tomorrow, I’m going to have a go at making some mini stockings and (possibly) some little birdies.

The Christmas trees were super-easy to make, and looked really cute when they were finished.  So, I thought I’d post a tutorial on how to make them.....


First, cut out 2 triangles of the fabric you want to use for the tree.  These could be as big or as small as you like (so I haven’t included a template).  Cut out one rectangle of the fabric you want to use for the tree trunk.  This should be twice as long as you want the trunk to be, as you are going to fold it in half before attaching it to the base of the tree.


Now fold the rectangular piece in half (right sides facing), and sew up the sides.


Turn the trunk piece right-sides-out.


Place the trunk piece on the right side of one of the triangular pieces, with the open end level with the base of the triangle.  Make sure it’s right in the middle.  Then pin it in place.
 

Now place the second triangular piece on top of the first (right sides facing).  Line up all the edges and pin in place.


Sew the pieces together, with a 1cm seam allowance.  Leave a small gap for turning your tree right-sides-out.


Now you can turn your tree right-sides out.  I used a chopstick to gently push out all the corners. 

   
Fill the tree with stuffing.  Again, I used my trusty chopstick – this time to poke the stuffing all the way into the corners of the tree.


When your tree is as firm as you’d like it to be, topstitch the little turning gap.  Then use a needle to attach some string or embroidery thread to the top of the tree, so that you can hang it up.  Now your tree’s finished - it’s as simple as that!

You could add some cute appliqué or buttons to your tree before sewing the pieces together, if you wanted it to have more detail.  Or you could make lots of them (as I did) in different Christmassy shades.  I think they’d look cute handing together somewhere!  These ones are to sell at my ‘Open House’ party, but I’m going to have to make some more – just for me!!!


I’m finding it hard to take decent photos at the moment (because it’s still dark when we leave for work in the mornings, and dark again by the time we get home).  But, when I get the chance, I’ll post some shots of other things I’ve been working on for the ‘Open House’.

Hope you’re all enjoying your Christmas crafting!

Carly

x

Friday, 11 November 2011

Baby Boy's Quilt

Well, first of all I wanted to share some exciting news with you.....  I’ve had my 1000th visit!  I know that’s a tiddly small amount really.  But, for me, it’s loads!!!  So, I just wanted to say thank you to everyone for stopping by to see me from time to time.  I love having visitors!  And receiving comments from you REALLY makes my day!

I’ve been waiting to share this with you for AGES.....  it’s my first ever quilt!  I made it for my lovely friend Jana, who’s going to be having a little baby boy very soon.  She worked at school with me before going on maternity leave.  Some months ago, other work friends suggested that I should make something that we could all give to Jana at a baby shower.  So, I did!!! 

I decided to make a cot quilt from some super-cute robot and cog fabric I bought from the amazing Fabric Rehab (who ship overseas for a very reasonable fee).  I made the quilt really thick, so that it could also/alternatively be used as a play mat.  Here it is:


I LOVED the process of choosing fabrics, cutting out the squares, arranging them (and rearranging them and rearranging them again) in a way that I thought looked nice, and sewing the squares together!  Sewing the squares together was really relaxing and lots of fun!!! 


THEN came the layering bit and the fixing-it-all-together bit.  I did my own thing when it came to the actual ‘quilting’ and ‘binding’ bits.  I stacked my three layers, sewed them together all the way round (apart from a small gap at the bottom).  Then I turned everything the right way out and sewed up the little gap.  To do the ‘quilting’ (and stop the batting from bunching up inside the quilt), I sewed through each corner where 4 squares met with several strands of red cotton, tying knots at the back and leaving the strands dangling.  I liked how this gave added interest to the otherwise plain underside of the quilt.  I know I cheated a bit here, though.  And I WILL have a go at ‘proper’ quilting sometime soon! 


I’d love to hear your (honest) comments on my quilt.  AND I’d love to hear from you if you can offer me any tips for future quilting projects.  I recently bought two charm packs from Fabric Rehab – ‘Just Wing It’ and ‘Sherbet Pips’, and I’m just wondering what to make with them.....  Another quilt, maybe?  Or some cushions?  I’d hugely appreciate suggestions on what I could make with my charm packs, or links to cool (but simple) quilting projects.....

I’m off to have a little drink, to celebrate my 1000th visitor!  Prost!!!

Carly

Friday, 4 November 2011

Another Beautiful Autumn Walk

The weather here in Düsseldorf has been pretty amazing, considering the time of year!  We’ve had more than our fair share of beautiful, sunny, blue-skied days.  Although I’d love for this weather to carry on until the day it starts snowing, I really don’t think that’s going to happen.  I'm guessing we have some rainy, yucky days to come before winter sets in.  So, we’ve been trying to make the VERY most of it while it lasts, by going out for lots of countryside walks.  Last weekend, we went for a walk across the fields by our house.  Just as we were setting off, I decided to take the camera along.  And I’m SO glad I did!!!  The colours were amazing, as the leaves have really started to turn now, and there was a stunning sunset too!!!

So, I thought I share a bit more autumn beauty with you.....


..... Oh, and look what I wore – my very first completed knitting project!  


Can you see the slightly unsightly stitching up the back?  Well, does anyone have any good tips (or links to good tutorials) on how to (neatly) sew up your knitting?  And what do you think of the hairdo (left over from the Halloween party the night before)???  ;-)

I hope you’re enjoying a beautiful Autumn wherever you are in the world.....

Carly

x

Tuesday, 1 November 2011

Halloween Handicrafts

As promised in my last post, this time I’m going to share some of our Halloween crafting projects with you. 

First of all, here’s our pumpkin.  I'm rather fond of him!


He was carved (as is tradition in our house) by the Mister.  Can you guess which character was the inspiration behind the pumpkin’s face?  After finishing the carving, my multi-talented other-half used the goo from the inside to make a yummy pumpkin soup!

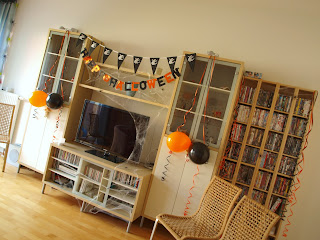
Here are some photos of our house, all dressed up and ready for our annual Halloween party.  It’s lucky I remembered to take these photos BEFORE the party, as it didn’t look quite the same afterwards!


We hung bats from ALL the lights – they were super-easy to make (just cardboard cut-outs folded down the middle and hung up with thread).  We put spider webs and big plastic spiders EVERYWHERE, including on our bonsai tree and all our pictures – another easy-peasy but effective decoration!  I made the cauldron from papier-mâché a few years ago (when I was dressing up as a witch for a Halloween dress-up day at school).  Now we use it to store sweeties for trick-or-treaters.

Notice that there’s nothing particularly scary about our decorations???  I prefer my Halloween decorations to be more ‘cute’ than ‘bloodcurdling’!  "Sorry!" to those of you who were expecting a bit of gore!  

And..... here are our costumes.....


I made my dress and my halo.  And my mom helped me to re-cover a wing frame with some pretty, starry tulle.  That task was WAY trickier and more fiddly than I’d anticipated!  It was a good job my mom was here to defuse my frustrations, otherwise the wings may well have ended up bin-bound!!!  Thank you, mom!!!!!  The devil’s horns and fork were homemade too (good old papier-mâché).  And we crafted a devil’s tail from some red fabric, stuffing and some garden wire.  Apologies for the less-than-great quality of the costume photos!

So, they were our Halloween handicrafts.  Now they’re all packed away in the Halloween box, ready for another year and another party.

I hope you all had a fun Halloween, dear readers!
 
Until next time.....

Carly

x
Related Posts Plugin for WordPress, Blogger...